Are you trying hard to download images on Xbox One but couldn’t find luck in this game? Well, you’re not the only one facing this problem. In fact, many Xbox players are struggling to find a way to download images on their consoles. But what if you are told there are ways to download pictures on Xbox One?
So if you are curious to know those methods, this article is for you. There are 6 techniques to download and save images on your Xbox One, and you will learn them step-by-step. Plus, at the end of the article, you will also learn a few tips to manage your saved images. So stay tight and pay attention to all the tutorials.
Table of Contents
6 Ways to Download Images on Xbox One
Indeed, the process of downloading images on Xbox One is a bit tricky. But if you follow the methods discussed below, you can easily download pictures on your console.
Method 1: Screenshot Your Images through Web Browsers
In this method, you learn how to download and save images from the web by taking a screenshot using a web browser.
- Step 1: Connect your Xbox One to your screen, and make sure it has a stable internet connection. Otherwise, you won’t be able to perform this tutorial correctly. Also, your game controller should be connected and in working condition.
- Step 2: Open the menu on your Xbox where you can see other apps and icons. From there, open your browser (Microsoft Edge).

- Step 3: This will open the web browser.

Make sure there is a cursor on the screen like this.

- Step 4: You can use the search bar to find the image from the internet. Once you have spotted your desired picture, move your cursor on it, and press the Right-Click menu button on your controller.

- Step 5: As soon as you hit the button, a menu will open with three options. Click on the ‘Save picture as,’ like in this screenshot.

- Step 6: Now, ensure you are saving the image on your device. Once confirmed, you can change the image name or format from the menu next to the ‘Save’ button. When you’re done doing that, hit the save button to store the image in your Xbox One memory.

Method 2: Save Images on Xbox One with File Downloader App
Here’s the second quite interesting method to download images on your Xbox One console. Although it’s a straightforward tutorial, you still need to follow the instructions in the steps to do everything correctly. Unlike the previous method, you will learn to save images on your device using a File Downloader application from the Microsoft Store.
- Step 1: Open the web browser on your Xbox One console and open the image link you found online. For example, Imgur is the source of images in this tutorial. So considering you are following the same website to download the image, follow the next step.

- Step 2: Open the image URL on Imgur (or any other site). So, here’s the image that will be downloaded using this tutorial.

- Step 3: Place your cursor anywhere on the image, like this.

- Step 4: Click the Right-click menu button on your controller to see the menu. From there, select the ‘Open image in new tab’ option.

Now remember, this is a very crucial step, and whether you are using Imgur or any other website to download images. You should always open the photo in a new tab before jumping to the next step.
- Step 5: In this screenshot, you can see that the image opened in a new tab.

So, the next thing you need to do is note down the image URL because you will need to enter it in the later steps. Remember, do not copy and paste the URL ever in this entire method. Or else it will crash your app.

- Step 6: Now, visit the Microsoft Store and click the ‘Search’ button, as you need to download the File Downloader.

- Step 7: When you hit the button, you will see a new window with a search bar. Click on it to activate the keyboard, and type ‘File Downloader.’ The search results will show you the application’s icon, as shown in the screenshot below.

- Step 8: Download the File Downloader application and click the ‘Launch App’ button to run the application.

- Step 9: Click the three vertical lines and choose ‘From URL.’

- Step 10: Then choose the destination and enter the file name first. It is up to you if you want to change the image name. For example, in this tutorial, the name of the image is changed to ‘Rally.png.’

- Step 11: Enter the image’s URL after filling in the destination path and name field. Again, you need to type the entire URL. Do not copy and paste it.

- Step 12: Hit the ‘start’ button at the bottom of your screen.

You should see a message stating, ‘No transfers in progress,’ it means the file has been downloaded on your Xbox One.

- Step 13: Go to your ‘Settings’ tab and hit ‘General.’ Then, choose ‘Personalization’ and then ‘My Background’ options. And lastly, select the ‘Custom Image’ tab.

- Step 14: Look on the left side and click the ‘Console’ icon. Then, select the ‘Pictures’ folder (or any other destination folder you chose in Step 10).

- Step 15: Search the image with the name you entered in Step 10. If you can find the picture, it means it is saved on your Xbox One. Select to use it as a background.

Method 3: Download Images on Xbox One from USB or External Drive
In this method, you will learn how to download images on Xbox One from your USB or external hard drive. The tutorial is divided into two parts. The first part shows how you can directly upload photos from the drive without any third-party application. The second part will help you download pictures on your console using the File Explorer app.
Method 3 – Part 1: Downloading Images to Xbox One Directly from USB / External Drive
- Step 1: Connect your Xbox One and insert the USB or external drive to the front or the back port on your console.
- Step 2: After plugging in the drive, click the ‘Settings’ icon on the home screen.

- Step 3: You will see a screen with a menu on the left and right side. So, under your username, click on the ‘General’ tab. Then, choose ‘Personalization.’

- Step 4: You will be taken to the ‘My Background’ page. From there, select the ‘Custom Image’ option.

- Step 5: You will see the three horizontal lines and a few more icons on the left side of the screen. If your console has detected the USB / external drive, you should also see the ‘Pen Drive’ icon.
- Step 6: Click on the ‘Pen / USB drive’ icon to see your stored files.

- Step 7: Open the folder where your desired image is present. Select the image and choose the ‘Move’ option. Then, select Xbox One as your transfer destination to move the pictures to the Xbox’s hard drive.
Method 3 – Part 2: Downloading Images to Xbox One from USB / External Drive through File Explorer
- Step 1: Launch your console and go to the Microsoft Store to download the ‘File Explorer’ application.
- Step 2: Connect your USB / External drive to your console and open the File Explorer app on your Xbox One. To do that, press the Xbox button on the controller and choose ‘File Explorer’ from the options.
- Step 3: Choose the USB / External drive to select your favorite pictures you want to download on your Xbox One.
Method 4: Download Images on Xbox One Using iPhone
Here’s the method for downloading photos on Xbox One through your iPhone. You will not only learn to choose a custom image from your iPhone to make your Xbox’s screen background. But the method will also help you save the picture in your console’s memory. Besides, this tutorial works on Xbox One and the Xbox X Series.
- Step 1: Download the ‘Media Player’ app from the Microsoft Store on your console. If it’s already installed, move on to the next step.
- Step 2: Launch the ‘Media Player’ application from your home screen by clicking it. And open your iPhone.


You might see the ‘No devices found’ message on your screen at this stage. This means your iPhone isn’t connected to your console.

- Step 3: Go to the App Store on your iPhone and search for the ‘TV Assist’ application.

- Step 4: Download the TV Assist app and open it.

When you do that, a pop-up with a Wi-Fi icon will appear on your screen like this.

- Step 5: Get back to your app and click on the ‘Settings’ icon at the bottom-right of the mobile screen.

- Step 6: This is the most important part of the entire tutorial. Here, you need to select some options correctly. Otherwise, you won’t be able to download your images on your Xbox One using an iPhone.
So make sure to tap the ‘Work as a Media Renderer’ and ‘Work as a Media Server’ options to put a check on both.

Once you do that, close the TV Assist application and open it again. Also, do not close the app and keep your phone somewhere near the screen. If you close the app, you won’t be able to continue with the next steps.

- Step 7: Click on the ‘Wi-Fi’ icon and wait for the screen to load.


There are good chances that a message pops up saying, ‘No files found.’ That’s part of the process, so don’t worry about it.

Just wait for a few seconds to see a few more pop-ups like this.

There could be two or more pop-ups with Wi-Fi icons, and one of them will take you to the next step. Therefore, you need to click on each pop-up to see which one has the files.
- Step 8: Assuming you have entered the correct pop-up icon, choose the folder in which you have images. For example, the pictures are in the ‘Photos’ folder.

- Step 9: Now choose the sub-folders to view the image you want to download on your Xbox One from your iPhone memory.

- Step 10: Click on the image to view it in large size.

- Step 11: Press the pause button on your controller to see the menu and choose the ‘Set as background’ option.

This will add the image to your Xbox One’s background. And in case you see any ‘Sign in’ error, simply click the ‘Close’ button.
- Step 12: Since the photo is your background, the file is saved in your console’s memory. So, go to your ‘Settings’ and choose ‘General.’ Select the ‘Personalization’ and ‘Customized image’ options. View the menu on the left side of the screen and click on the ‘Console’ icon to see your photo in the console’s drive.
Method 5: Download Images on Xbox One Using Android Smartphone
In this tutorial, you will understand how to download images on Xbox One with the help of your Android phone and OneDrive application. However, you need to create a OneDrive account with the same Microsoft account information you use to sign in to Xbox.
But the good news is that with OneDrive access, you don’t have to download the image as you learned previously. It is because the photo will be easily accessible from your Xbox One unless you delete it from the cloud.
So here’s what you need to do.
- Step 1: Open Google Play on your mobile phone and search for ‘OneDrive.’ You will find the ‘Install’ option, so click it to download the app to your device.

- Step 2: Open the OneDrive app and click the ‘SIGN IN’ button. If you haven’t made an account yet, click ‘SIGN UP’ to create one.


- Step 3: Since you will be logging into your OneDrive account from mobile for the very first time, you might see some company’s offers. Feel free to ignore them by tapping the ‘GOT IT’ button.

- Step 4: The next step will take you to the ‘Save your memories’ screen. It means the app asks permission to enable uploading images and other files from your phone to the cloud. So, tap the ‘TURN ON CAMERA UPLOAD’ and then tap ‘Allow’ to give permission.


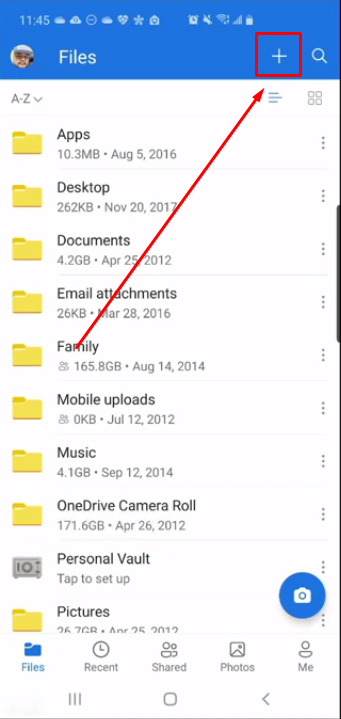
- Step 5: Since you give access, you should see the ‘Files’ menu with a ‘+’ icon at the top of the screen. So, tap on the + icon.
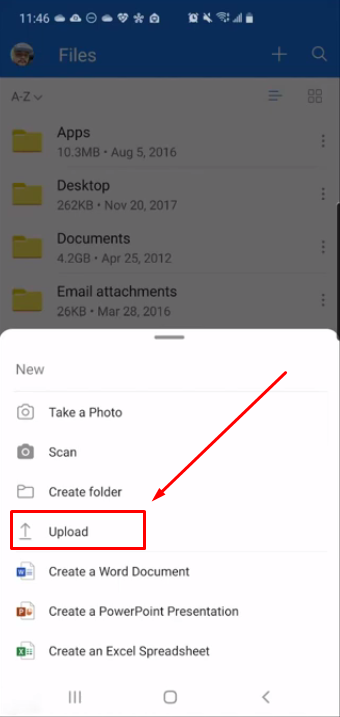
- Step 6: Once done, a menu will pop up from the bottom of the screen with various options. From there, tap ‘Upload’ to add images you want to download on your Xbox One.
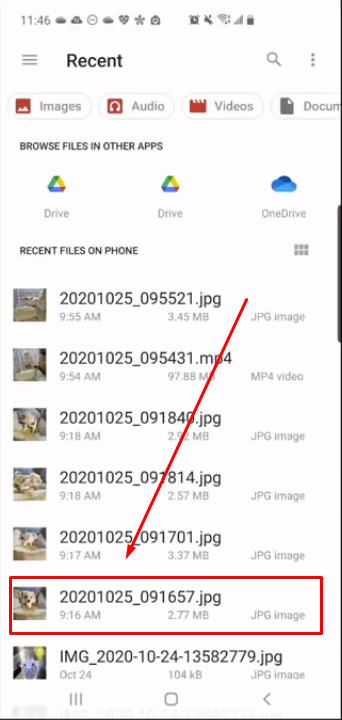
- Step 7: Next, choose the photo you want to upload on OneDrive. For example, you can see the image with the ‘657.jpg’ name at the end has been selected.
- Step 8: Tap the ‘Files’ menu to confirm that the image you selected in the previous step has been uploaded to the cloud. If you can’t find it, try refreshing the app.

- Step 9: This step is about downloading and opening OneDrive on your console to access the image you just uploaded from your Android phone. So, connect your Xbox One and click on the ‘Xbox’ icon on the top left of the screen. Then, click on the Microsoft Store icon.

- Step 10: You should see an empty search bar. So, click on it to enable the keyboard and type ‘OneDrive.’ You will be halfway there, writing the complete app name, and you will be able to see the ‘OneDrive’ application under the ‘Suggested results.’

- Step 11: Tap the ‘OneDrive’ icon and click the ‘Install’ button.

- Step 12: After installing the app, launch it and go to the ‘My Files’ option to find the uploaded image from your Android phone. Click the photo to open and view the file on your Xbox One.

Note: If you have uploaded the image in any other folder, such as ‘Photos,’ then click that specific folder name to see the file.
Method 6: Download Images on Xbox One with Your Windows PC and TMX App
Fortunately, you can also download images on your Xbox console through your Windows desktop or laptop. Nevertheless, you will need a third-party application, ‘TMX,’ to make this transfer successful. But, the overall process is simple and quick.
- Step 1: Go to the ‘Microsoft Store’ on your PC and install the TMX app using the same method. Also, create your account and log in. Then, upload the images you want to upload on your Xbox One.
- Step 2: Visit the main screen of your Xbox One and click on the ‘Microsoft Store.’

- Step 3: Click the search bar and type ‘TMX’ in the search field. When you see the ‘TMX’ application icon, click to install it on your console.


- Step 4: Launch the TMX app, and sign in on your console with the same account information you entered in Step 1. Wait for a few seconds to complete the loading process.


- Step 5: Move the cursor on your console at the top left side of the screen and click the ‘Home’ icon. This will open a menu with several options. Next, click the ‘Upload Image’ tab.

- Step 6: After choosing the upload image option, you will see an ‘Upload’ screen with images in the red box you copied and pasted from your PC.
Note: Since no images were uploaded for this tutorial, you see a blank screen in the screenshot. So don’t get confused.

- Step 7: Click to enlarge the image, and feel free to use it as a background or save it on your Xbox One hard drive.
Alert: Problem in Saving Images on Xbox One with Microsoft Edge
Many users have reported that they are unable to save photos on their Xbox One through the internet via the Edge browser application. Since this has become a serious concern, Microsoft officially announced through its Customer Support team that the feature is not available anymore.
It is because the Microsoft Edge browser has a new update that doesn’t let you save images directly on your console’s hard drive from online sources. In Microsoft’s view, the alternative option is to use OneDrive to make a two-way transfer between the Xbox One and other devices, like PC or mobile phones.
However, if you are still running the older version of Edge, you can try saving images from the browser. Otherwise, you still have the OneDrive option.
Tips on How to Manage the Saved or Downloaded Images on Your Xbox One
So you have learned 6 ways to download or save images on Xbox One. Now, you will explore tips to manage your photos or videos by understanding how to access, share, and delete saved pictures.
1. Accessing Your Saved / Download Images
In the previous section of this article, you have learned how to access saved or downloaded photos from the ‘Settings’ options. But here’s one more way to enter those files.
So, after saving an image, go to the ‘My games & apps’ menu from your Xbox One’s dashboard. Then, choose the ‘Captures’ option to open your Capture Gallery. Here, you will be able to see all the videos and images you have saved on your console. Moreover, you can also easily access the saved files from the Xbox mobile application available for both Android and iOS users.
2. Sharing Your Saved / Downloaded Images
Did you know that Xbox One allows you to share saved or downloaded photos with friends and fan followers? To do this, go to the Capture Gallery and choose the image you want to share. Doing so will open a menu with various options, including ‘Share.’
From there, choose ‘Share’ and select the ‘Platform’ on which you want to share the file, such as Facebook or Twitter. Once you have decided on the platform, simply write a great caption and hit the share button.
3. Deleting Your Saved / Downloaded Images
If you think you have a lot of images eating your console’s memory, you can delete them easily. For that, visit your Capture Gallery and choose the video or image you want to remove from the device. Choose the ‘Delete’ option from the menu and hit ‘Delete.’ Confirm your decision to remove the file from the Xbox One permanently.
4. Managing Your Xbox One Storage Space
It is important to remember that Xbox One has an internal memory / hard drive that fills up quickly if you download plenty of images or videos. Therefore, you need to check the storage space and manage its capacity.
To do that, open the ‘My games & apps’ menu and choose ‘Storage.’ You will be able to view the percentage of storage that has been used. Go ahead and delete unwanted images to make some room for more space.
Conclusion
You can use Xbox One as your photo-saving device if you know ways to download images. There are six major methods to save your favorite pictures and use them as your screen’s background. Or simply to make a copy of the files in case you lose them from other devices.
You can download photos from online resources and save them in your Xbox One through web browsers like Microsoft Edge or Chrome. Likewise, you can install a file downloader to do the same job. You can also download images on your Xbox One via external hard drives or USBs.
Moreover, the console even allows you to upload images using your Android and iOS smartphones. And, of course, Xbox One lets you download photos from your Windows laptop with the help of the TMX app.
FAQs – How to Download Images on Xbox One
Q1. Where are saved images on Xbox One?
The saved or downloaded images are in the ‘Captures’ option. You can also find them under the General Settings tab when you click the ‘Console’ icon.
Q2. Can I set a customized background on my Xbox One from my phone?
You can use any photo as your Xbox One background by transferring the image from your phone with the help of external apps like ‘TV Assist’ and ‘OneDrive.’
Q3. Why am I unable to download images on my Xbox One?
If you are using the latest version of Microsoft Edge browser to download images from the internet, you won’t be able to do it. The new update of Edge prevents users from saving images from online sources.
6 Ways How to Download Images on Xbox One
It is advised not to play games while downloading files as it may crash the app or hang the console.
Q5. Is transferring images to Xbox One through a USB safe?
Yes, transferring images via USB is completely safe. But make sure the pen drive is not infected by malware.


![How to Download Audio from Youtube [Step by Step]](https://cdn.hollyland.com/wp-content/uploads/2024/05/30144555/how-to-download-audio-from-youtube-step-by-step.jpg)
![How to Record Audio on PC [Step by Step]](https://cdn.hollyland.com/wp-content/uploads/2024/05/30145104/how-to-record-audio-on-pc-step-by-step.jpg)
![How to Save Audio Messages on iPhone [Step by Step]](https://cdn.hollyland.com/wp-content/uploads/2024/04/30145407/how-to-save-audio-messages-on-iphone-step-by-step.jpg)