Achieving a perfect streaming quality is crucial for professional gamers and live streamers. Whether you are live-streaming or recording content, using capture cards for auditing audio can help you to create high-quality content and gives you an immersive experience.
That’s why understanding the importance of capturing audio from your capture card is essential. Whether the sound effects in a video game or the commentary during a live stream, audio adds depth and excitement to your content. But what if you don’t know how you can hear audio from the capture card? In that case you read this post. Below we have discussed how you can hear audio seamlessly while gaming and streaming.
Yet, before getting started with the steps to hear the audio in capture cards, you must know that Setting up your capture card and configuring the software you use for streaming and gaming is equally essential so that you don’t have trouble while hearing the audio.
So let’s start without further ado!
Table of Contents
Setting up of Capture Card and Software used in Streaming and Gaming!
Setting up your capture card and configuring software to capture audio from it might seem daunting at first, but don’t worry! Below we have discussed a step by step guide about the capture card and software separately.
Note: We are discussing OBS as an example for software below!
Setting up the capture card—
- Connecting capture card
Begin by connecting your capture card to your computer using the USB or HDMI wire provided. Check that the capture card works with your computer and operating system.
- Install the required software
Some capture cards require special software to work properly. Install the most recent drivers and software from the manufacturer’s website on your computer.
- Turn on your console or other media source
If you’re recording gameplay with a capture card, ensure your console or gaming PC is turned on. Other media sources, such as a camera or mobile device, should also be connected and powered up.
- Connect your console to the capture card
Connect your gaming console or media source to the capture card using HDMI or other compatible wires. For the particular connections required, refer to the manufacturer’s instructions.
- Connect the capture card to your computer
After connecting your console to the capture card, connect the capture card to your computer using another HDMI or USB wire. Again, the correct connections should be found in the manufacturer’s instructions.
- Verify that the capture card is recognized
Check if the capture card is recognized by OBS or the software given by the capture card manufacturer. It might be necessary to choose it as a video source within the software.
You can make sure if your capture card is correctly set up and prepared to record audio from your preferred media source by following these instructions. After you’ve completed the physical setup, it’s time to set up OBS to capture audio from your capture card.
Setting up OBS to capture audio from a capture card—
So your capture card has been properly set up, now you can set up OBS to capture audio from it. OBS has numerous audio capture options, including capturing desktop audio and specific audio sources. Here’s how to set up OBS to record audio from your capture card:
- Install OBS
Start OBS on your computer. If you haven’t already, go to the official website and download and install OBS.
- Choose your audio settings
At the bottom right of the OBS window, click the “Settings” button. Navigate to the “Audio” option in the Settings menu.
- Select audio devices
Locate the “Mic/Auxiliary Audio” area under the “Audio” tab. Select your capture card as the audio device from the dropdown menu. This will ensure that OBS captures audio from your capture card directly.
- Adjust the audio levels
You may alter the audio levels for your capture card under the same “Audio” tab. OBS allows you to independently regulate the level of each audio source. For the finest audio quality, ensure that the volume levels are balanced and optimized.
- Additional audio sources
If you want to integrate other audio sources, such as a microphone or music from your computer, you can do so in OBS by going to the “Sources” tab. Simply select the desired audio source by clicking the “+” button.
- Preview and test
Before you begin recording or streaming, click the “Preview Stream” option to confirm that the audio from your capture card is properly coming through. Make any necessary changes to the audio settings.
You are now ready to begin recording or streaming with audio after configuring OBS to collect audio from your capture card and adjusting the required audio settings! Take some time to become acquainted with the OBS interface and experiment with various audio sources to achieve the desired audio mix for your content.
Remember to check for software updates for both OBS and your capture card on a regular basis to ensure compatibility and access to the most recent features and upgrades. After successfully setting up capture cards and OBS, it’s time now to tell you how you can hear audio from capture cards.
How to Hear Audio from Capture Card?
Well, capture cards are essential for recording high-quality video streaming to capture and share gameplay moments. However, it is equally crucial to ensure that you can hear audio from your capture cards in order to create immersive and engaging streaming. Below, we have mentioned everything in step-by-step to help you efficiently hear audio from your capture card.
Steps to Hear Audio from Capture Card with OBS—
Step 1: To get started with OBS Studio, go to the settings and click the advanced options.

Step 2: Click on Default in the Audio section.

Step 3: Now choose the audio-monitoring device you have. Don’t just leave it on default.

Step 4: Click Apply and then OK

Step 5: Click Edit and then Advanced Audio Properties. You can also select this by clicking the gear icon next to specific sources.
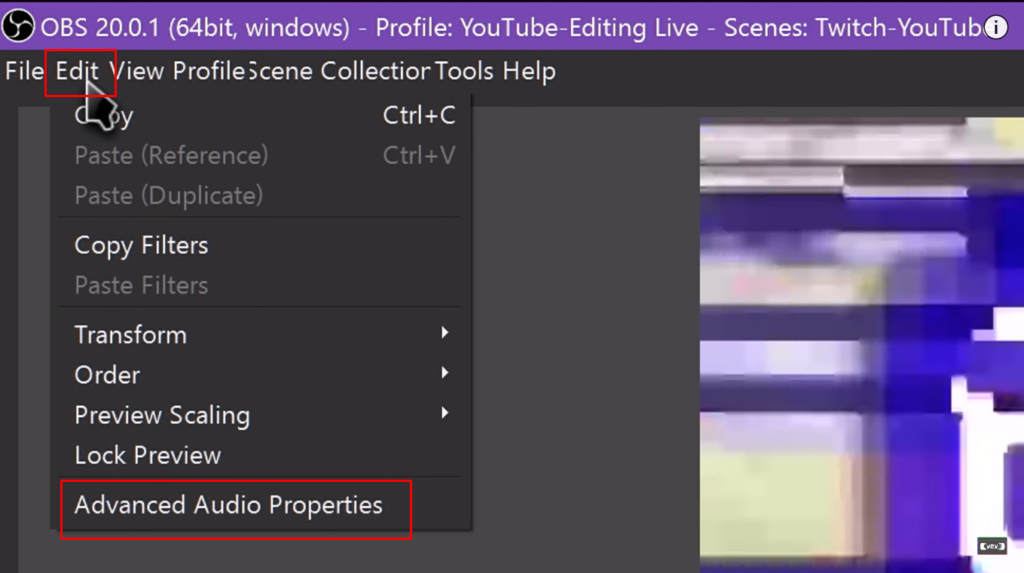
Step 6: You will be next on the Advanced Audio Properties dialog. (Here you can monitor your audio sources with headphones. While it was on default, all the sources are set to monitor off)

Step 7: When you click Monitor off from any source, for example, Music, you will have two other options to choose from— Monitor only (mute output) and Monitor and Output.

Note: These are mostly self-explanatory. Monitor and Output allow you to loop an audio source to your headphones and push it back to the stream. This can be useful if you have an audio track going but don’t want it directly checked in the mixer and going straight to the stream. At the same time, Monitor Only (mute output) aims to loop the audio source to your headphones so you can hear it without echoing to your stream.
However, if it does not work, here is a trouble-shooting solution of how you can fix it.
Step 1: Right-click your speaker icon in your window system tray and click on Recording Devices.
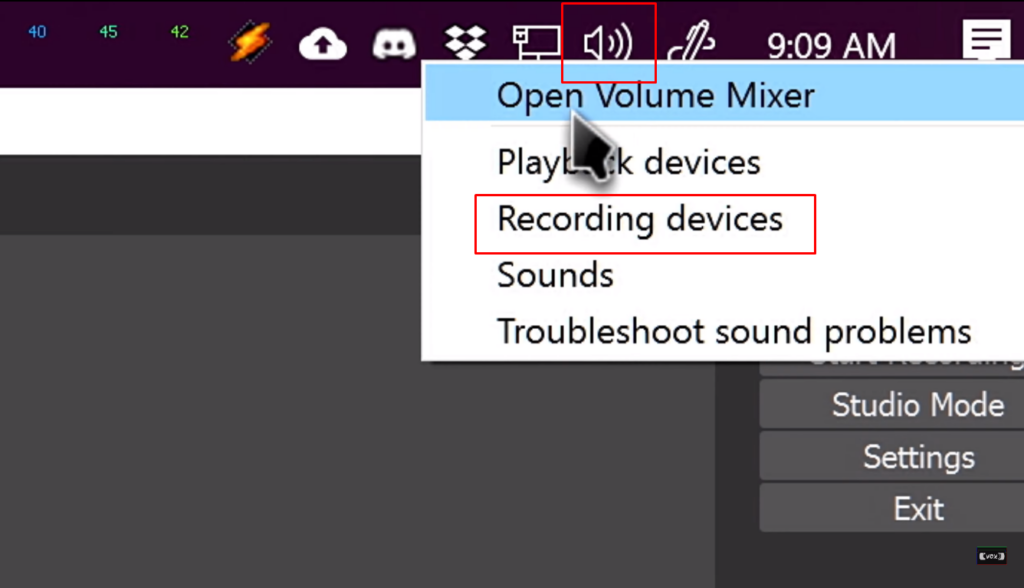
Step 2: Go through the properties in each of them and click the listen tab. Make sure to Listen to this device is uncheck:

Note: Having this checked will already loop the sound through your computer speakers as it is.
If it doesn’t fix your problem with “monitor only,” try editing to the forums. This is because there are issues with some USB drivers or random anomalies that could prevent it from working properly. If this is consistently a problem for you, then it might be a good reason to use “Monitor and output “and uncheck the audio source from going to your stream normally. This way, the source is consistently pushed to your stream. Although, if this causes a bigger echo, put it bacon Monitor only”. It doesn’t replace a complete, adequately set up physical audio mixer, but this is a great feature to reduce the need for one.
Conclusion
Overall, using a capture card to improve your content creation or sharing experience can be beneficial, but audio difficulties might make this process difficult. You may ensure a flawless and high-quality hearing experience by understanding the possible causes of not hearing audio in capture cards and adopting the solutions suggested. Regular maintenance, driver upgrades, and careful attention to settings will help you resolve audio-related issues and focus on creating engaging content for your audience.
FAQ’s
Q1. How to adjust audio settings in OBS?
To optimize your audio settings in OBS, consider the following steps:
Step 1: Open OBS and go to the audio settings.
Step 2: Configure the sampling rate and audio format.
Step 3: Set up audio mixers
Step 4: Enable noise suppression and noise gate.
Step 5: Adjust the audio sync offset
Step 6: Audio levels should be tested and monitored.
Q2. How can you troubleshoot some common audio issues?
Here are some troubleshooting tips to get you started:
- No audio from the capture card: If you’re not hearing any audio from your capture card, double-check your capture card’s connections to the computer.
- Out of sync audio: Adjust the audio sync offset in OBS if the audio from your capture card is out of sync with the visual.
- Poor audio quality: Check that all wires are securely connected if the audio quality from your capture card is poor or distorted.
- Background noise or echo: Enable noise suppression and noise gating in OBS if you’re encountering background noise or echo in your audio recordings or streams.
- Background noise or echo: Enable noise suppression and noise gating in OBS if you’re encountering background noise or echo in your audio recordings or streams.
Q3. Is audio available in OBS display capture?
OBS captures your device’s default audio, so you don’t have to worry about sound, but you can permanently alter the audio device in the OBS settings or add an audio device as a source to any scene that requires it. In the Audio Mixer, you can either mute or modify the volume.
Q4. Is a capture card preferable to OBS?
Many accomplish using the OBS screen recorder. But a capture card will provide you with the most excellent quality recordings on YouTube. This is particularly beneficial if you have a twin PC configuration and require a smooth recording transition from the first PC to the second without encountering any problems.


