


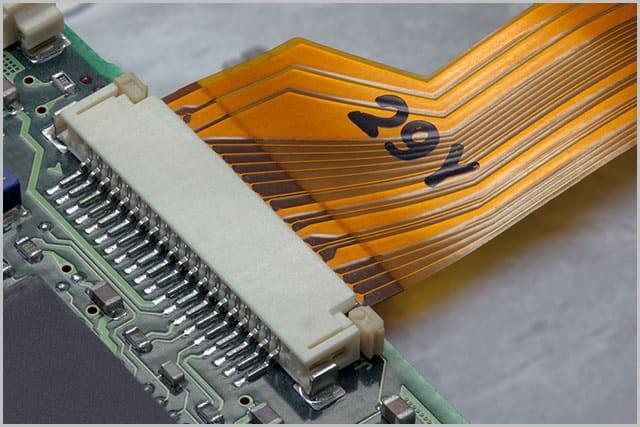
Have you ever looked inside electronic devices, such as a computer? You will find flat cables connecting storage drives and hard drives with motherboards. These are the ribbon cables, and they are essential for the performance of numerous gadgets.
Cicoil Corporation introduced ribbon cables in 1956. They replaced inflexible and large cables with a series of conducting wires. The first time these cables were used was in the mainframe computer. With time, these cables evolved into the cables we see today. Engineers improved the functionality and design of these cables.
What is a Ribbon Cable?
Ribbon cable is a series of wires insulated together, forming a flat ribbon. Its purpose is to transmit data and communicate information. You will find ribbon cables in computers and gaming consoles. They are flat, thin, and multi-conductor cables that are only found for internal connections. The cables are high quality, with a space-saving and flexible design. They reduce EMI and RFI, improving assembly performance and maintaining functioning. They withstand extreme temperatures and have a long life.
Types of Ribbon Cables
Ribbon cables are commonly used in electronics and computing to connect internal components. They consist of multiple conducting wires running parallel to each other on the same flat plane. This design allows for easy organization and efficient connection of multiple pins in a single plug.
Below are the various types of ribbon cables, each tailored for specific applications and environments:
- Standard Ribbon Cable
The standard ribbon cable is the most widely used type. It is characterized by its simple design of parallel wires encased in a flexible plastic sheath. This type is often used in internal computer connections, such as linking motherboards to hard drives, CD drives, and other peripheral devices.
The standard ribbon cable is appreciated for its simplicity and cost-effectiveness, making it a staple in many electronic devices. Its flat and flexible structure allows for easy routing and installation within tight spaces, which is crucial in compact electronic assemblies.
- Rainbow Ribbon Cable
A rainbow cable is a variation of the standard ribbon cable. It features color-coded wires in a repetitive pattern. This color-coding aids in identifying individual wires within the bundle, which simplifies the process of installation and troubleshooting.

Rainbow ribbon cables are especially useful in complex systems where multiple connections need to be made, as the color coding minimizes the risk of wrongly connecting the wires. These cables are often found in applications where clarity and accuracy are paramount, such as in prototyping, custom electronics, and educational projects.
- Bonded Ribbon Cable
Bonded ribbon cables are designed with an additional layer of adhesive that binds the individual wires together more securely than standard ribbon cables. This bonding adds extra durability and resistance to mechanical stress, which is beneficial in environments where the cables are subject to frequent movement or vibration.

Bonded ribbon cables maintain the flexibility of standard ribbon cables while offering enhanced strength and stability, making them suitable for industrial applications and environments with rigorous physical demands.
- Twisted Flat Ribbon Cable
The twisted flat ribbon cable combines the characteristics of both flat and twisted-pair cables. In this type, adjacent pairs of wires are twisted together within the flat cable structure. This design helps reduce electromagnetic interference (EMI) and crosstalk between the wires, which can improve the overall signal integrity.

Twisted flat ribbon cables are often used in high-speed data transmission applications where maintaining signal quality is crucial. They provide a balance of flexibility and performance, making them ideal for use in communication systems, networking equipment, and sensitive electronic devices.
- Round to Flat Ribbon Cable
Round to flat ribbon cables are designed to transition from a round cable format to a flat ribbon structure. This design combines the advantages of round cables—such as enhanced flexibility and ease of routing—with the organized, parallel structure of flat ribbon cables.

The round portion of the cable allows easy threading through confined spaces, while the flat portion facilitates efficient connection to standard ribbon cable connectors. These cables are particularly useful in applications where space constraints and the need for organized wiring are both considerations, such as in aerospace, medical devices, and compact electronic systems.
Different Ribbon Cable Connectors
Ribbon cables require specific connectors to ensure proper interfacing with electronic devices. These connectors are designed to maintain the integrity of the connections while accommodating the flat structure of ribbon cables. Here are some of the most commonly used ribbon cable connectors, each with its unique features and applications:
DIN 41612

DIN 41612 connectors are standard in Europe and are widely used in telecommunications and industrial applications. These connectors feature a rectangular shape with multiple rows of pins, making them suitable for high-density connections. They are known for their robustness and reliability, which are essential in environments where the connectors are subject to frequent plugging and unplugging.
DIN 41612 connectors are often found in rack-mounted systems, computer backplanes, and other modular electronic assemblies where secure and durable connections are crucial. They support a variety of configurations, including signal, power, and hybrid connections, making them versatile for different applications.
BT224
The BT224 connector, also known as the British Telecom connector, is primarily used in telecommunications. This connector is designed to interface with ribbon cables efficiently, providing a stable and secure connection.
BT224 connectors are characterized by their rectangular shape and multiple contact points, which ensure reliable signal transmission. They are commonly used in network equipment, telecommunications infrastructure, and other applications where consistent signal integrity is essential.
The robust design of BT224 connectors helps them withstand the demands of high-frequency usage and environmental factors, ensuring long-term reliability.
D-Subminiature

D-Subminiature, or D-Sub, connectors are versatile connectors that can be used with ribbon cables. They feature a distinctive D-shaped metal shield that provides mechanical support and ensures proper alignment during connection.
D-Sub connectors come in various sizes and pin configurations, ranging from 9 to 50 pins or more. These connectors are widely used in computer and industrial applications, including serial and parallel port connections, video displays, and network interfaces.
The D-Sub’s robust design and shielding capabilities make it suitable for applications that require secure and reliable connections, even in environments with significant electromagnetic interference (EMI).
DIL Headers

Dual In-Line (DIL) headers are commonly used in conjunction with ribbon cables to connect printed circuit boards (PCBs). These headers feature two parallel rows of pins that fit into corresponding holes on a PCB. DIL headers are used in a variety of electronic applications, from consumer electronics to industrial control systems.
DIL headers provide a simple and effective way to connect ribbon cables to a PCB, ensuring that multiple signals can be transmitted simultaneously. Their ease of installation and reliability make them a popular choice for many electronic designs.
PCB Transition Header

PCB transition headers are designed specifically for transitioning from ribbon cables to PCBs. These headers feature a series of pins that match the spacing of the wires in a ribbon cable, allowing for easy and secure connections.
PCB transition headers are often used in applications where ribbon cables need to be connected to a PCB without additional soldering or complex assembly. They provide a reliable and straightforward solution for integrating ribbon cables into electronic systems, ensuring that connections are made accurately and efficiently.
Micro Ribbon

Micro ribbon connectors are designed for high-density applications where space is a constraint. They are also known as miniature Ribbon (MR) and Miniature D Ribbon (MDR) connectors. These connectors feature a compact design with closely spaced contacts, making them ideal for use in small electronic devices and compact assemblies.
Micro ribbon connectors are commonly used in data communication and computer applications, such as SCSI (Small Computer System Interface) connections, where high data transfer rates and reliability are essential. The compact size and high contact density of micro ribbon connectors make them suitable for applications where space is limited, but performance cannot be compromised.
Things You Should Know Before Removing/Reinstalling Ribbon Cable
Removing and reinstalling a ribbon cable requires careful handling to avoid damage to the cable and the device. Here are key points to keep in mind:
Measure and Identify
Before removing the ribbon cable, measure its width and length and note the cable type. If you need a replacement, purchasing the exact type from the manufacturer is often necessary to ensure compatibility.
Release the Plastic Clip
Ribbon cables are secured by a plastic clip. To remove the cable, flip the clip up to release it. When installing the new cable, insert it gently in the same orientation as the old one and push the clip back down to lock it in place.
Connector Handling
If the ribbon cable has a connector, you may need to crimp a new connector to the replacement cable. Ensure the connector is securely attached before inserting it into the port.

Steps to Remove Ribbon Cable in Computers
- You have to check if the computer is powered off. Unplug it from any power source.
- Unscrew and remove the latches securing the case to access the internal components.
- Find the ribbon cable you need to remove, connecting the motherboard to drives or other peripherals.

- Identify the plastic clip or latch securing the cable. Gently lift or flip the clip to release the cable.
- Carefully pull the ribbon cable straight out from the connector to avoid bending or damaging it.
How to Insert:
- Position the new ribbon cable so that it aligns correctly with the connector.
- Gently insert the cable into the connector until it is fully seated.
- Push the clip back down or flip it to secure the cable in place.
- Reattach the case cover and secure it with screws or latches.
- Plug in and power on the computer to ensure the cable is functioning correctly.
Steps to Remove Ribbon Cables in TV
- Ensure the TV is powered off and unplugged.
- Unscrew and remove the back cover of the TV to access the internal components.
- Find the ribbon cable connecting the various boards within the TV.

- Gently lift or flip the clip securing the ribbon cable.
- Carefully pull the ribbon cable straight out of the connector.
How to Insert:
- Position the new ribbon cable correctly with the connector.
- Gently push the cable into the connector until it is fully seated.
- Flip or push down the clip to lock the cable in place.
- Replace the back cover and secure it with screws.
- Plug in and power on the TV to check for proper functionality.
Steps to Remove Ribbon Cables in Xbox
- Ensure the Xbox is powered off and unplugged.
- Use the appropriate tools to open the Xbox case.
- Identify the ribbon cable inside the console.
- Gently lift or flip the clip securing the cable.

- Carefully pull the ribbon cable out of the connector.
How to Insert:
- Position the new ribbon cable correctly with the connector.
- Gently push the cable into the connector until it is fully seated.
- Push or flip down the clip to lock the cable in place.
- Reattach the case and secure it with the appropriate screws.
- Plug in and power on the Xbox to ensure the cable is functioning correctly.
Steps to Remove Ribbon Cables of PlayStation Controller (PS4)
- Ensure the PS4 controller is powered off.
- Remove the screws securing the controller casing.
- Find the ribbon cable connecting the various components inside the controller.

- Gently lift or flip the clip securing the ribbon cable.
- Carefully pull the ribbon cable out of the connector.
How to Insert:
- Position the new ribbon cable correctly with the connector.
- Gently push the cable into the connector until it is fully seated.
- Push or flip down the clip to lock the cable in place.
- Reassemble the controller casing and secure it with screws.
- Turn on the controller to check for proper functionality.
Steps to Remove Ribbon Cables from GameCube
- Ensure the GameCube is powered off and unplugged.
- Use the appropriate tools to open the GameCube case.
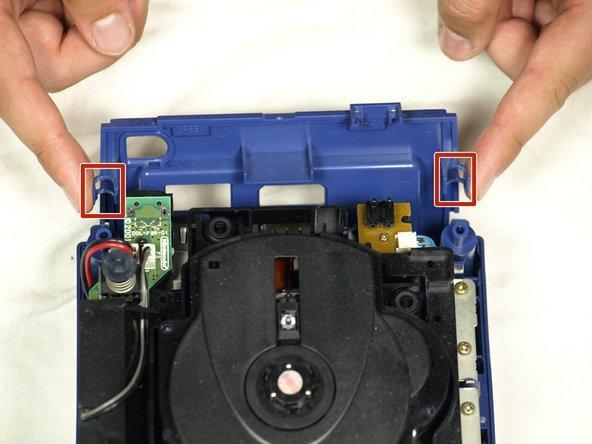
- Identify the ribbon cable inside the console.
- Gently lift or flip the clip securing the ribbon cable.
- Carefully pull the ribbon cable out of the connector.
How to Insert:
- Position the new ribbon cable correctly with the connector.
- Gently push the cable into the connector until it is fully seated.
- Push or flip down the clip to lock the cable in place.
- Reattach the case and secure it with the appropriate screws.
- Plug in and power on the GameCube to ensure the cable is functioning correctly.
Tips to Carefully Remove Ribbon Cable from Your Device
Removing a ribbon cable from your device can be a delicate task. Following the proper steps ensures that you don’t damage the cable or the device. Here are some tips to help you safely and effectively remove a ribbon cable:
Ensure the Cable is Free from Secondary Connections
Before removing the ribbon cable, ensure it is free from any secondary connections. Ribbon cables often connect to multiple components or may have additional securing clips. Disconnect any other cables or connectors that might be attached to the ribbon cable. This will prevent any unnecessary strain on the cable or connectors, reducing the risk of damage.
Use Dental Floss to Lift the Cable
Dental floss can be a useful tool for gently lifting the ribbon cable. Slide a piece of dental floss under the cable at a corner or edge. Slowly and carefully pull the floss up, lifting the cable without applying too much force. This method is particularly effective for cables that are adhered to a surface, as it allows you to lift the cable evenly without bending or kinking it.
Apply Low Heat to Soften the Adhesive
Ribbon cables are occasionally fastened with adhesive. Low heat can soften the glue and facilitate the removal of the cable. Apply light heat using a hair dryer or a heat gun to the region where the cable is stuck. Take care not to overheat the gadget or the cord, as this could cause harm. Lifting the cable from the surface will be easier once the adhesive has softened.
Use Isopropyl Alcohol
Adhesive residues can be effectively removed with isopropyl alcohol. Spoon a tiny bit of isopropyl alcohol onto the ribbon cable attachment place. Let it sit for a few minutes to dissolve the glue. Lift the cable gently, and if troublesome regions still need it, dab on additional alcohol. This technique allows the cable to be removed neatly and without leaving any adhesive residue behind.
Use Rolling Motion for Peeling
When peeling the ribbon cable away from a surface, use a rolling motion rather than pulling straight up. Start at one edge of the cable and roll it back over itself, applying gentle pressure as you go. This technique minimizes stress on the cable and reduces the risk of tearing or damaging the conductors within the cable. The rolling motion helps to gradually release the adhesive without sudden jerks that could cause harm.
Be Gentle and Patient
Patience and gentleness are crucial when removing a ribbon cable. Rushing the process or applying excessive force can easily damage the delicate cable or the connectors. Take your time and work slowly, especially if the cable is stuck or if it is your first time handling such a task. Carefully observe how the cable is secured and follow the appropriate steps to release it. If you encounter resistance, reassess the situation and ensure that no additional securing mechanisms are overlooked.
Get Expert Help
Seek professional assistance if you have trouble removing or reinstalling a ribbon cable or if the instructions provided are ineffective. Skilled technicians can handle fragile electrical components without damaging them because they have the right equipment and knowledge. This guarantees that your gadget stays whole and works, avoiding more problems that can result from careless treatment. Seeking professional assistance is highly recommended to preserve the lifespan and functionality of your devices.
Conclusion
Ribbon cables provide dependable internal connections for a wide range of devices, making them indispensable parts of contemporary electronics. Since they were first introduced, they have undergone substantial evolution, becoming more functional and stylish. Electronic gadgets operate at their best and last longer when ribbon cables are handled correctly and understood. The integrity and performance of any electronic equipment depend on the proper management of ribbon cables. Whenever in doubt, it’s a good idea to get professional assistance.
FAQs
Q1. How to disconnect the laptop ribbon cable?
To disconnect a laptop ribbon cable, follow these steps:
- Power off the laptop and unplug it.
- Locate the ribbon cable connection, typically found under the keyboard or back panel.
- Identify the plastic clip or latch securing the cable.
- Gently lift or flip the clip to release the cable.
- Carefully pull the ribbon cable out of the connector, ensuring you do not bend or damage the cable.
Q2. How to remove the switch ribbon cable?
To remove a switch ribbon cable:
- Power off the switch and disconnect any power sources.
- Locate the ribbon cable connected to the switch.
- Identify the securing mechanism, such as a clip or latch.
- Release the clip by gently lifting or flipping it.
- Carefully pull the ribbon cable straight out from the connector to avoid bending or damaging the wires.
Q3. How do you remove wired ribbon wire?
To remove a wired ribbon wire:
- Ensure the device is powered off and unplugged.
- Identify any clips, latches, or securing mechanisms holding the ribbon wire.
- Release the securing mechanism by gently lifting or flipping it.
- Slowly and carefully pull the ribbon wire out of the connector, keeping it straight to avoid damage.
Q4. How do you strip back ribbon cable?
To strip back a ribbon cable:
- Use a sharp utility knife or wire stripper.
- Carefully separate the wires by making a small cut between them at the desired length.
- Gently pull apart the separated wires.
- Strip the insulation from each wire individually, taking care not to damage the conductors inside.
Q5. Can you replace the ribbon cable connector?
Yes, you can replace a ribbon cable connector. Follow these steps:
- Remove the damaged connector by releasing any securing mechanisms and gently pulling the cable out.
- Obtain a compatible replacement connector.
- Attach the new connector by aligning it with the ribbon cable and securing it in place.
- Ensure the connection is firm and the cable is properly seated to avoid signal loss or damage.
Q6. How do you remove a DS ribbon cable?
To remove a DS ribbon cable:
- Power off the Nintendo DS and remove any power sources.
- Open the device casing to access the ribbon cable.
- Locate the clip or latch securing the ribbon cable.
- Gently lift or flip the clip to release the cable.
- Carefully pull the ribbon cable out of the connector, ensuring you do not damage the delicate wires.
Q7. What to do if the ribbon cable is broken?
If a ribbon cable is broken:
- Identify the type and specifications of the cable.
- Purchase a replacement cable from the manufacturer or a compatible third-party supplier.
- Follow the device’s disassembly instructions to remove the broken cable.
- Install the new cable, ensuring it is properly seated and secured with any clips or latches.
- Reassemble the device and test for proper functionality.
Q8. How do you remove a stuck ribbon cable?
To remove a stuck ribbon cable:
- Ensure the device is powered off and unplugged.
- Check for any clips or latches securing the cable and release them.
- Apply a small amount of isopropyl alcohol to dissolve any adhesive holding the cable.
- Gently wiggle the cable back and forth to loosen it.
- Use dental floss or a plastic tool to lift and guide the cable out of the connector carefully, avoiding excessive force to prevent damage.