


With Logic’s game-changing pitch correction feature, achieving flawless vocals are essential for quality productions. Also, Logic allows you to edit the songs or change the tracks and ensures harmony with different audio tracks. The pitch correction is often regarded as the backup plugin to bring life to your recordings.
However, knowing how to use the pitch correction feature will provide flexibility and enlighten your work. So, understanding how to implement the pitch correction will scale up your projects by preserving the natural sounds.
What is pitch correction in Logic Pro?

The process of modifying the pitch of recordings that will fit and provide the creative effect to songs. Commonly known for creating vocal harmonies that will push the boundaries by shaping your emotions. Also, it automatically edits the different frequency tunes and makes a fashionable sound.
The Pitch Correction plugin of Logic Pro is Autotune which will give complete control over the pitch. However, the correction speed and effects depend on you, which will remove the errors from your recordings.
For professionals, pitch correction is a robust plugin that provides all the parameters to transform your vocals and is budget-friendly. When using the plugin, optimize the controls because it’s the easiest way to in-tune your songs or instrumental recordings by adjusting the pitch of individual notes.
Also, Logic Pro provides various third-party plugins to enhance your performance but pitch correction polish and brings artistic corrections. And using it correctly will remove the artificial sense, and mastering it will bring precision to your vocal transformations.
How to Use Pitch Correction in Logic Pro?
The audio processing pitch correction technique will modify the vocals for quality musical productions. The pitch correction or Logic’s Autotune plugin will quantize and bring harmony to the pitches. And hereunder step-by-step guide will help you understand how you can use and optimize the full potential of pitch correction.
Step 1- Open the Logic Pro
- Click to open the latest version of Logic Pro.
- Open the project if you want to apply pitch correction and prepare to apply the changes.
Step 2- Adding Pitch Correction
- First, press the “X button” to open the mixer view showing “Channel Strips.”
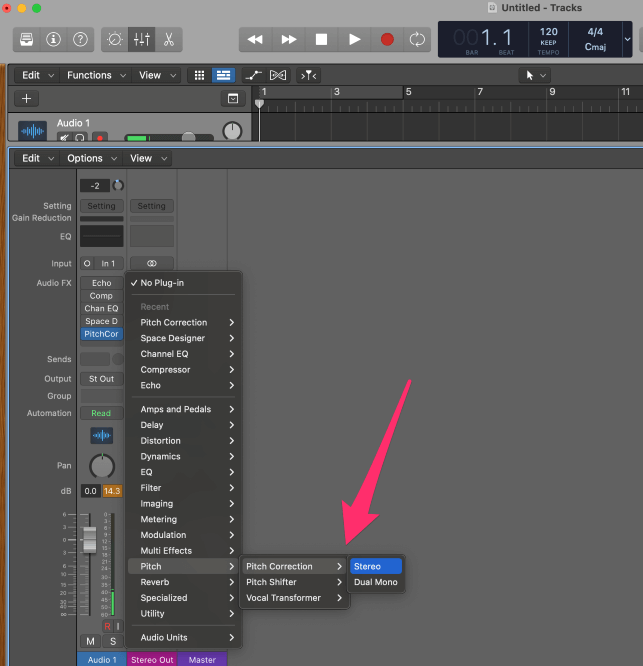
- Then, from the timeline bar’s center, click “Tracks” and select “Pitch.”
- After that, click Pitch Correction from the next window, and the plugin window will pop up.
Step 3- selecting project tracks
- You can choose stereo or mono tracks depending on the type of your project
The Pitch Correction plugin will be added and used over single or multiple vocal tracks. And understanding how it works using different controls will help nourish your overall workability. However, there are two possible hereunder methods to understand and use pitch correction efficiently:
Method 1
Step 1- Using Flex Pitch
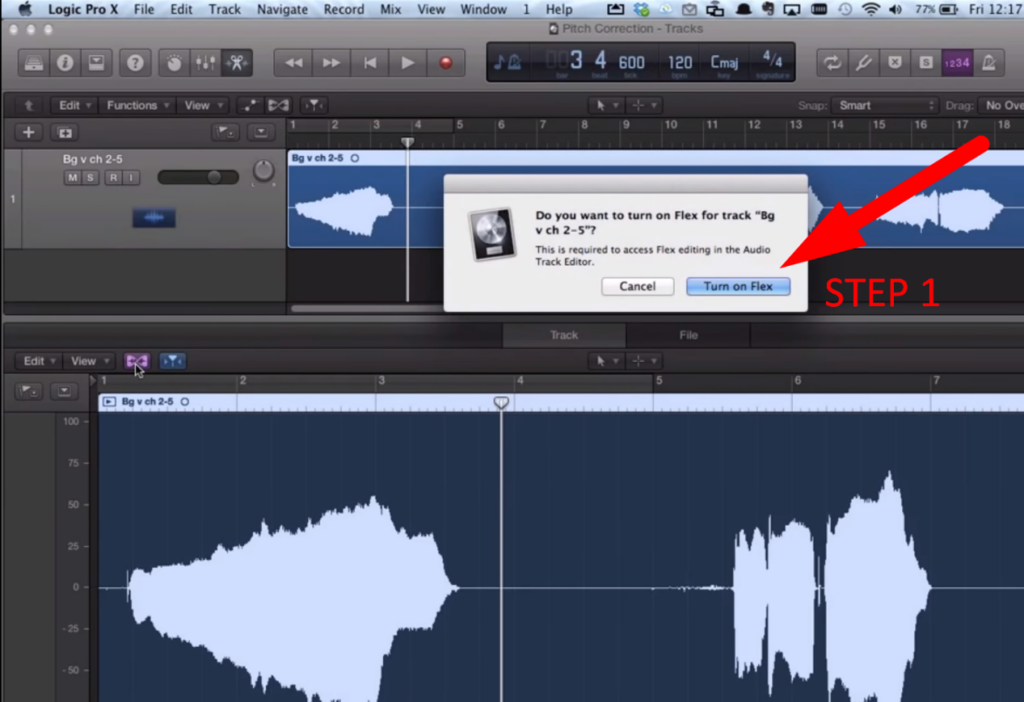
- First, turn on the “Flex Tool” by clicking the “Show or Hide Flex” button.
- With this, Logic will analyze the selected tracks and choose the type of flex you want to use or select the “Flex Pitch.”
- In this mode, Logic carefully observes the pitch and phrasing of the tracks.
Step 2- Setting the Pitch
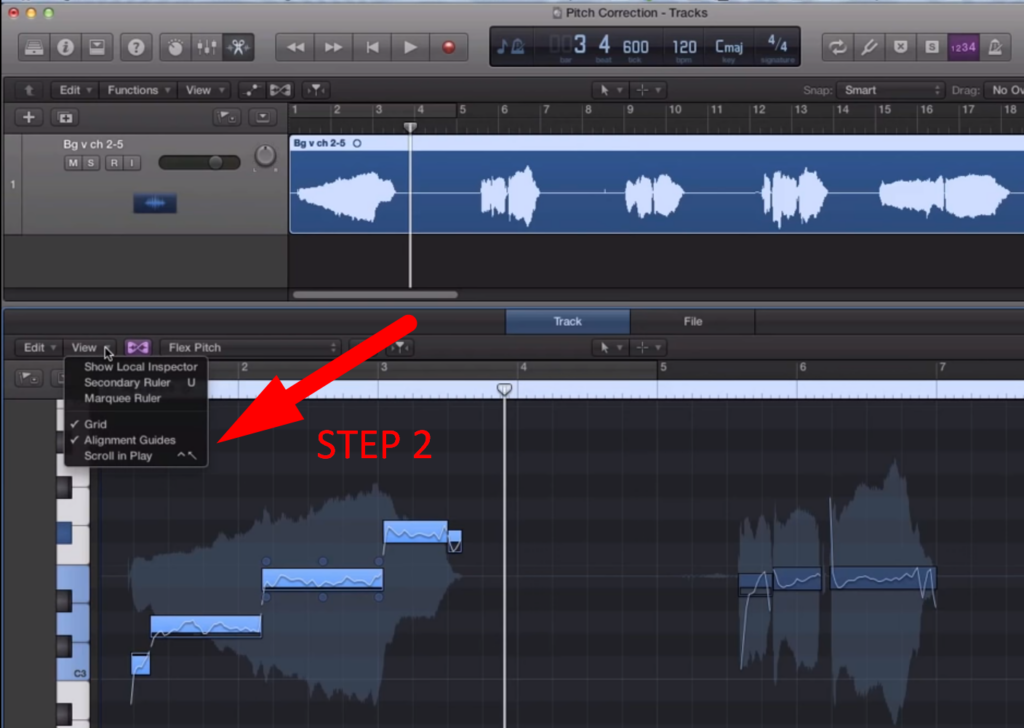
- Piano Role View shows the notes as pitch, and it will deliver the audio pitch that is on or off with a vibrato effect.
- Then select the notes to “Pitch Correct,” and from the “Timeline bar,” click “Show Local Inspector.”
Step 3- Pitch Correction
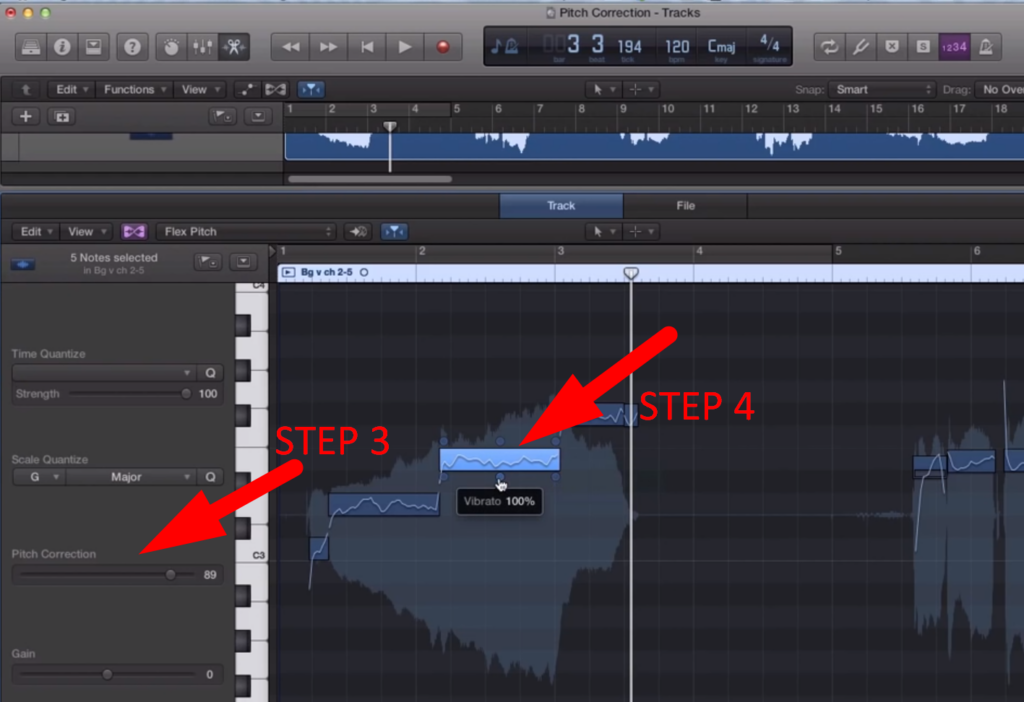
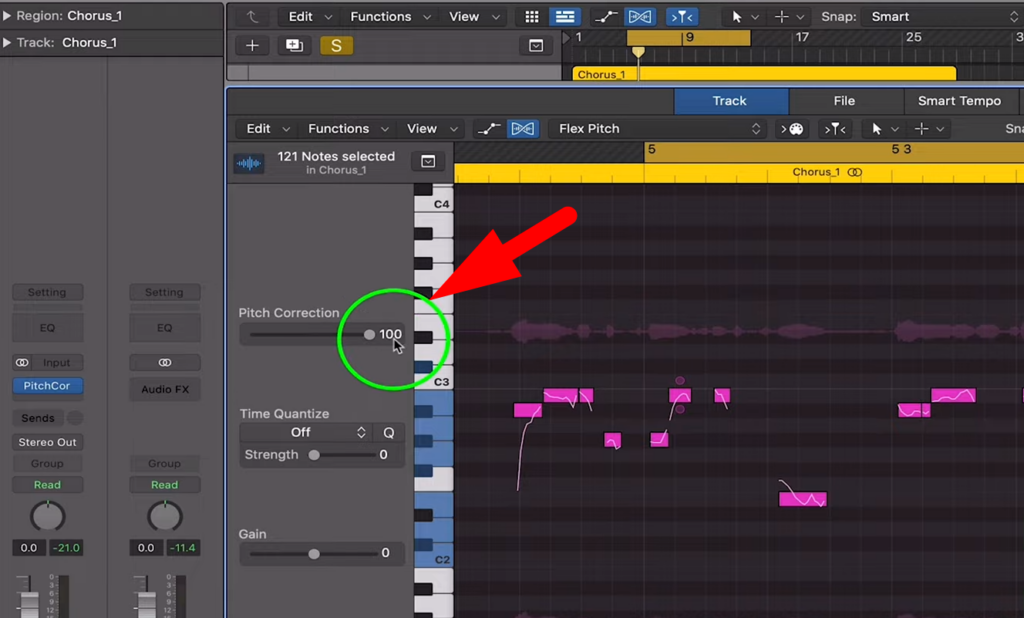
- After that, click “Scale Quantize” and select the “Root G” and “Major Scale,” and it will give you the amount of correction that you want to apply.
- Apply Pitch Correction from a scale of “0-100” that suits your recordings best.
- With this, you can also change the “Gain” of the selected tracks.
Step 4- Adjusting the Tracks Pitch
- Clicking on the notes gives a list of different parameters, and the top-left handle allows “Pitch Drift.”
- Also, you can change the “Fine Pitch” by changing the middle of the handle.
Additionally, you can manually set or check the Root or Scale of the plugin for natural vocals. It also allows you to change the characteristics of notes and increase or decrease the vibrato effects. After pitch correction, play and listen to the tracks for natural-sounding enhancement.
With this, you can analyze in-depth pitches of the tracks and can easily set the parameters to bring harmony among the vocals. Also, you can manually or automatically select the plugin, but checking the results after every modification is recommended.
Method 2-
Step 1- Setting the parameters
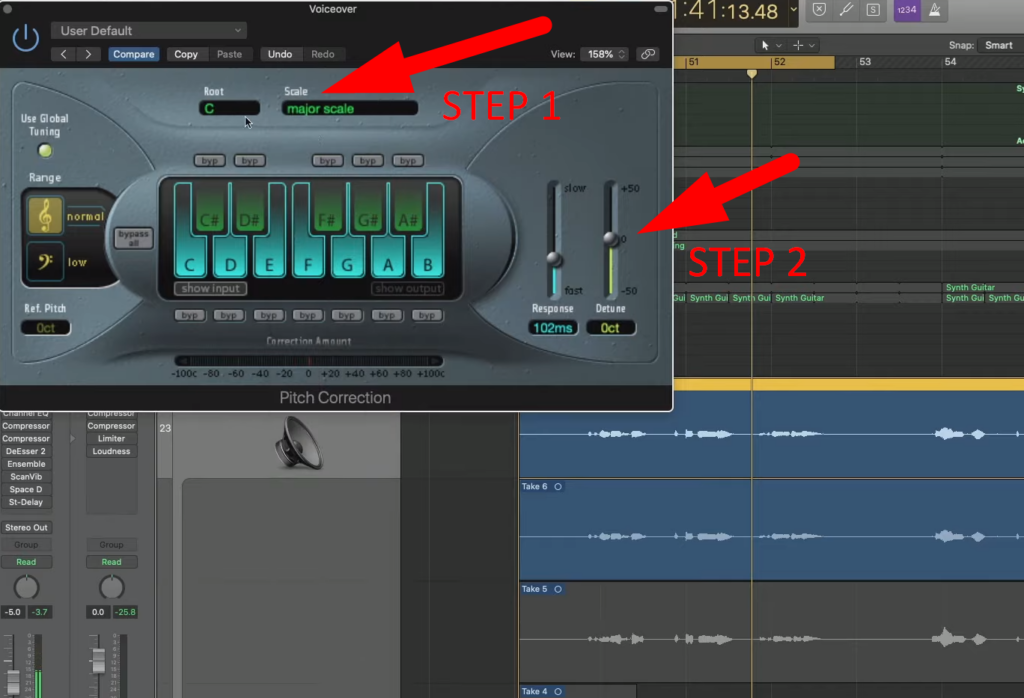
- The key is to set your vocal notes and select those you want to correct or apply the changes.
- Estimates the amount of pitch you’re trying to modify by turning on the modulator from your source pitch.
- And from the pitch correction plugin, click “Scale” and select “Major Scale” from the drop-down menu.
- Then click on “Root” and choose “D” Root.
Note: Selecting the “Scale” and “Root” depends entirely on you, and you can select the Scale that suits your vocals.
Step 2- Adjusting Detune and Response
- And you will be able to change the C Sharp with C Natural, which will correct the selected notes.
- Additionally, from the right side, you can select “Detune or Response”; slowly increasing the response will give your songs a more productive human-like nature.
Note: You can take the letters out as default notes or manually select the Scale. And can have a slower response or the fastest response by taking the toggle from the highest point to the lowest point and can set Detune effect.
Then set your Scale to “Major Scale” You can identify the Root by noticing the pitch results from every one of them. And it’s how you can correctly implement pitch correction to your vocals that will remove the artificial touch and elevate your work.
It’s essential to determine the Scale and root note of the tracks and check the “Audio to Score” to analyze the performance. Additionally, bypassing the plugins and listening to the audio is mandatory because sometimes the pitch problem may not be audible from the plugin.
Conclusion
The pitch correction or Logic’s Autotune feature allows you to bring harmony to your vocals and removes errors. After setting the plugin to your logic projects, it’s crucial to analyze the controls for better functioning. With two prominent methods, this guide will develop a complete understanding of creating natural-sounding music.
So, for professionals and sound engineers, pitch correction is influential in bringing voice transformation. However, relying on something other than this plugin for editing is not recommended; it only brings perfection to your vocals.
Frequently Asked Questions
Why is the Pitch Correction plugin not working on my Logic Pro?
When you are unable to apply pitch correction to the desired tracks, it’s usually due to bugs, glitches, or plugin issues. And due to this, it becomes impossible to produce the desired modification that may attract the audience.
- The quickest way to solve this issue is to quit and restart the Logic, and it’s recommended because it will remove temporary issues.
- Another way is to reset your Logic to default, and it will restore or remove every issue related or not related to pitch plugins.
- Then ensure that you’re using the latest versions of Logic and installed it perfectly along with the pitch correction plugin.
When applying any of the abovementioned methods, ensure you have saved your progress because it will remove the open work.
What is the response time for logic pitch correction?
The response time indicates the average pitch correction over the designated period. It’s the key to success, and the recommended response settings must be between 60-120 milliseconds that will create natural-sounding music.
With the fastest response time, everyone can hear pitch correction effects and create quantizing products. So, before exporting your final results, ensure to check the response settings because it’s effective in bringing down the latency.
What is the difference between Autotune and Logic Pro pitch correction?
Logic’s Pitch Correction works like autotune and is easy to use, which brings excellent results to your vocals. When comparing, Autotune is the automatic process of adjusting the pitch correction, and you have to select the keys to get a modification. Its quick turnout speed minimizes the errors and tunes the vocals with negligible latency.
However, Logic’s pitch correction allows manual control over your vocals enabling you to analyze your lyrics at every step. There are versatile third-party Autotune plugins, but pitch correction is economical and brings flexibility to your work.


![How to Reinstall Audio Drivers? [Step by Step]](https://www.hollyland.com/wp-content/uploads/2024/05/how-to-reinstall-audio-drivers-step-by-step.jpg)
![How to Cut Audio in Audacity? [Step by Step]](https://www.hollyland.com/wp-content/uploads/2024/05/how-to-cut-audio-in-audacity-step-by-step.jpg)
![How to Record Audio on Google Slides [Step by Step]](https://www.hollyland.com/wp-content/uploads/2024/05/how-to-record-audio-on-google-slides-step-by-step .jpg)