


Ever snapped a photo on your phone only to find it stuck in a perpetual processing limbo, the wheel spinning endlessly below? This occurrence, experienced by several users, has been a topic of discussion within the Samsung community .

Many people are stuck with their pictures endlessly processing, like they’re stuck in a loop. This got everyone searching for solutions and talking about their experiences with others who are really into tech stuff.

One user in the Samsung community specifically highlighted an inability to delete, move, or edit the photo, met with an unyielding “Couldn’t move image to trash. Try again” error message. Undoubtedly, such a situation can lead to immense frustration.
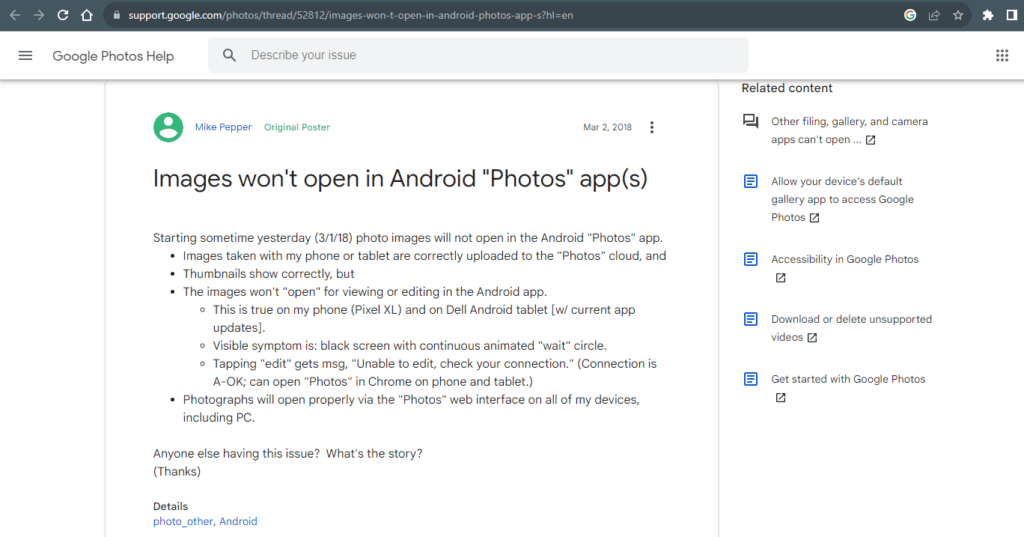
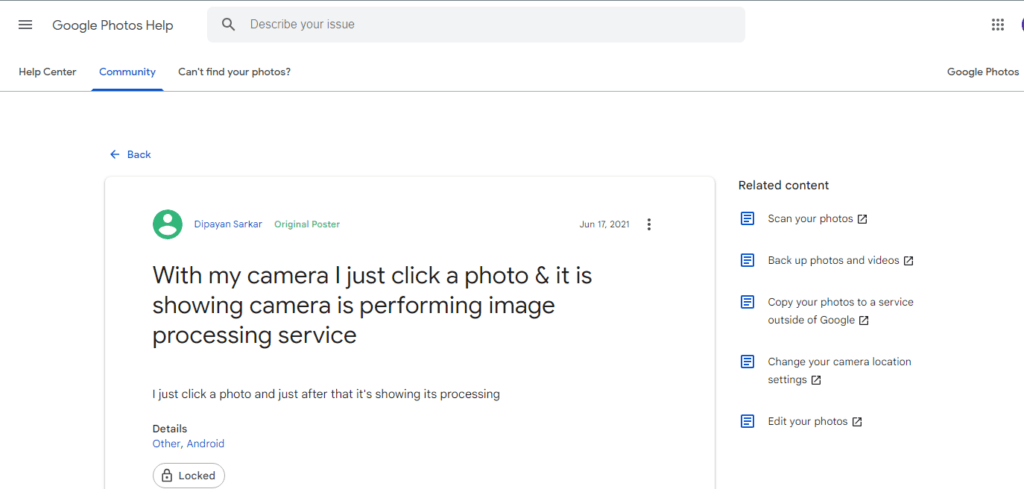
Likewise, there have been reports on Google Photos Help of an issue where images fail to open for viewing or editing within Android’s “Photos” app. Users encountering this problem are met with a persistent black screen accompanied by an animated “wait” circle, indicating ongoing processing without displaying the images.
Obviously, people are voicing the same problem in different ways. Some might say their pictures are stuck in a never-ending processing loop, while others describe it as a frustrating delay in their photos being ready. It’s essentially the same issue, just described using different words or experiences.
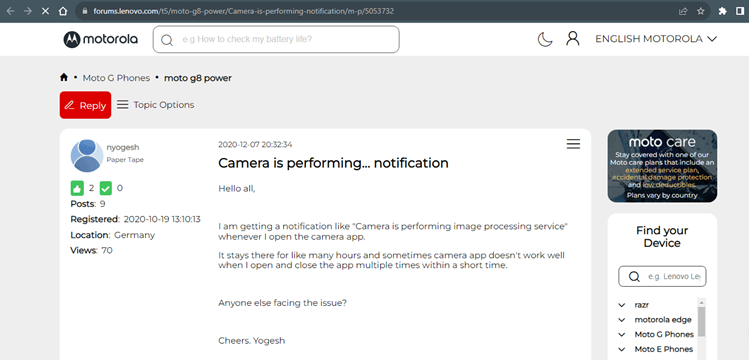
For instance, in the Lenovo forum, a user shared their frustration, mentioning that every time they open the camera app, they receive a notification saying, “Camera is performing image processing service.” It seems like they’re facing a similar issue where this notification pops up consistently when trying to use the camera.
Given the frustration this situation can bring, we’ve taken a deep dive into this issue to identify potential problems and solutions. Our aim is to assist you in rediscovering the joy of capturing moments with your phone!
Understanding why phone camera is performing image processing service
The “processing image” notification on your phone isn’t typically a cause for alarm. It’s usually a signal that your camera app is actively utilizing its image processing capabilities. This can involve various tasks happening in the background, such as adjusting focus, fine-tuning exposure, or applying filters and enhancements to images before or after they’re captured.
This notification commonly appears on specific devices or camera apps to simply inform users that the camera is actively engaged in processing tasks. It’s generally nothing to worry about; it’s just indicating that the camera software is working to ensure optimal image quality or applying specific features.
A user on the Google Photos Community Support Forum received advice when facing a similar experience. The suggestion was reassuring, explaining that it’s normal for processing to occur within a specific timeframe after capturing an image. The camera app consistently processes every captured image to store it in formats like JPEG. Additionally, opting for HDR may prompt the camera to internally process multiple images, eventually presenting a single, enhanced image to the user.
While it’s typically nothing alarming, prolonged processing times might signal an array of underlying issues within your phone’s camera app. When your camera stalls, refuses to open pictures, or incessantly displays a processing sign, several factors could be at play:
- Absence of camera app permission: If the camera app lacks permission to access the camera hardware or related functionalities due to settings or permissions being disabled, it might result in a perpetual processing state or prevent the app from functioning correctly. This lack of permission essentially restricts the app’s ability to utilize the camera, leading to the observed delays or malfunctions in processing images.
- Temporary app bug: A short-term issue within the camera app that might resolve on its own or with a quick restart.
- Software glitch: Larger software-related problems that affect the camera app’s functioning, potentially requiring software updates or troubleshooting.
- Corrupted app cache or data: Damaged or cluttered files stored by the camera app, which might need clearing to restore proper functionality.
- Interference from third-party apps: Other apps on your phone causing conflicts or disruptions to the camera app’s operation.
- Bad or malicious third-party apps: Problematic apps installed on your device that could be negatively impacting the camera’s performance.
- Hardware malfunction: Physical issues with the phone’s camera hardware, requiring professional inspection or repair.
Should you encounter concerns or experience issues linked to these complaints from users, like slow performance or camera malfunctions, there are a number of fixes that you can try out. You may consider checking for updates to your camera app or your device’s operating system. Updates often bring enhancements that can improve the camera app’s performance, potentially resolving any notifications or issues you might be facing.
In the following section, you’ll find a detailed guide on steps you can take to tackle the problem of your camera taking too long to process pictures.
What to do when your phone camera is performing image processing service for too long
While various support pages might offer different solutions to the prolonged picture processing issue, here, we’ll present a comprehensive guide. This guide will you provide users with a unified set of steps that can be applied systematically to effectively resolve the problem of a phone camera taking excessively long to process pictures.
- Verifying Permissions:
Upon initially using the Camera app, it requests access to your device’s storage and camera. However, recent app updates might have altered these permissions. To rectify this, use these steps;
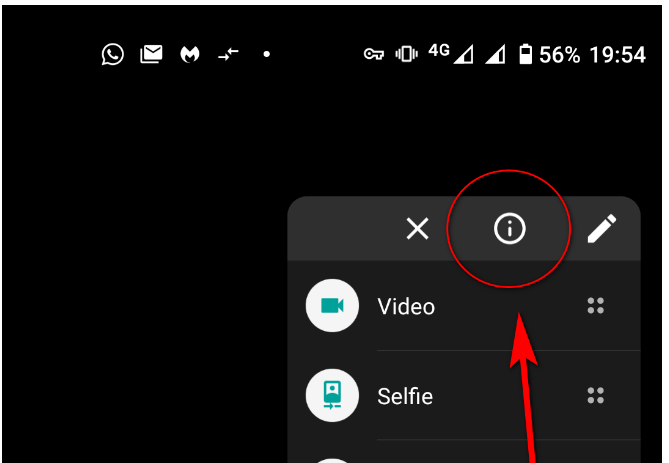
Step 1: Long-press the Camera app icon and select the ‘i’ icon.
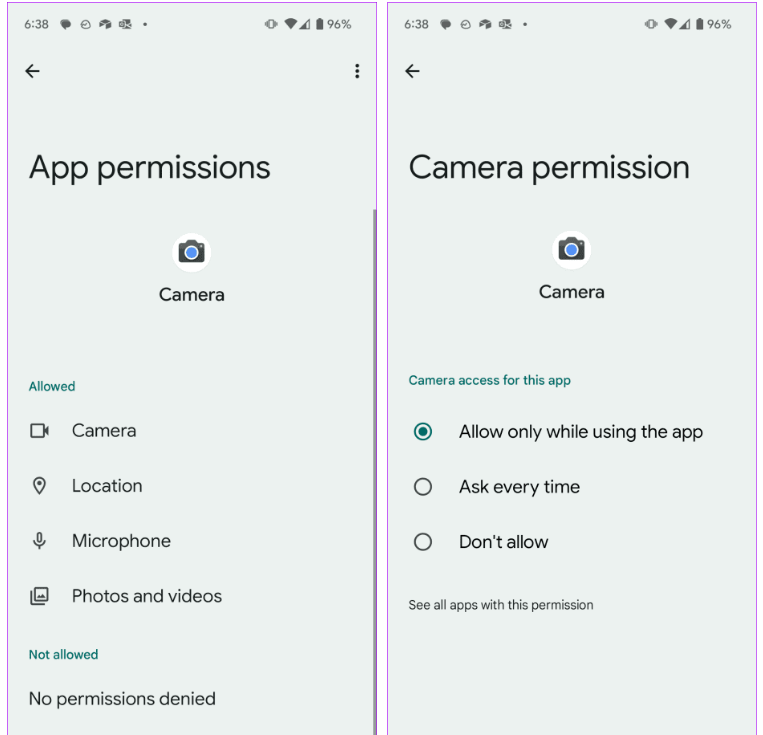
Step 2: This action opens the app info menu. Choose Permissions.

Step 3: Ensure that permissions for Camera, Location, Microphone, Photos, and Videos are granted within the displayed menu.
- Force-close the camera application.
At times, resolving camera problems might only require a simple restart of the app. Extended usage might prompt continuous animated “wait” circle as explained in Google Photos Help . Force quitting refreshes the app, clearing temporary bugs or glitches that trigger errors or hinder app launch.
To force quit your Android camera app, adhere to these steps:
- Launch the Settings app.
- Select “Apps.”
- Tap the More settings icon (usually three dots in the upper right corner).
- Choose “Show system apps.”
- Locate and select the camera app from the list.
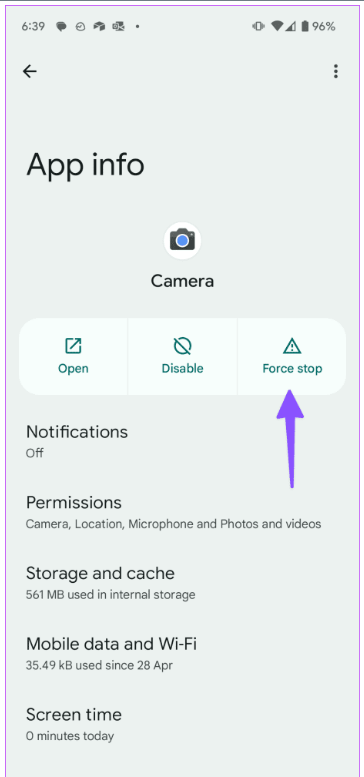
- Tap “Force Stop.”
- Restart your phone.
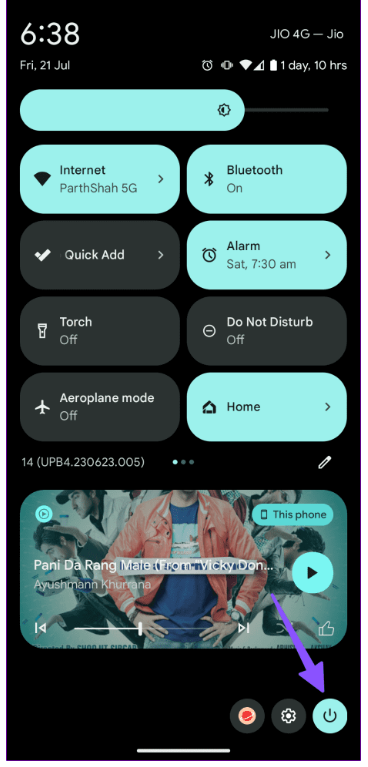
If force quitting the camera app or any third-party app hasn’t resolved the issue, consider restarting your Android device. Occasionally, bugs or software glitches might disrupt app functions. To investigate if the problem is temporary, perform a reboot. Press and hold the Power button, then select “Power off” to completely shut down the device. Keep the phone off for approximately 30-60 seconds before powering it back on. This process refreshes the system and might rectify the issue.
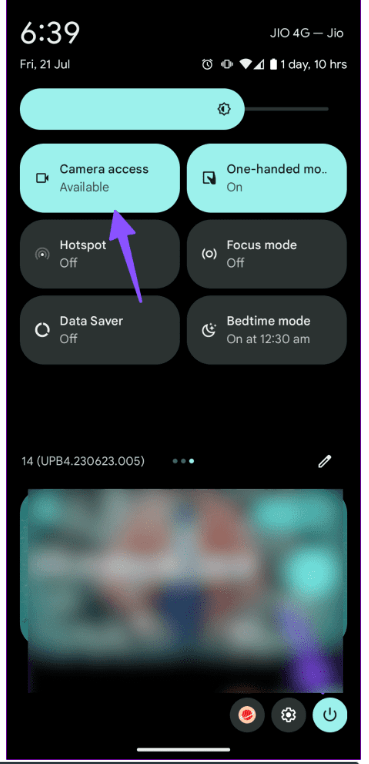
- “Enable System-Wide Camera Permission
As a privacy measure, Android now allows users to disable system-wide camera permissions. If you previously disabled the camera for privacy reasons, it might result in a black screen when using the Camera app. To do this, follow these easy steps;
Step 1: Swipe down from the home screen to access the quick toggles menu.
Step 2: Turn on the Camera toggle.
- Ensure Another App Isn’t Using the Camera
If you’re live streaming via YouTube or Twitch, or actively using the camera on Instagram or Snapchat, it might disrupt the primary Camera app on your Android device.
Android now features an active indicator showing when an app uses the phone’s camera in the background—a green dot appears in the top-right corner. Tap it to view the app using the camera and close it if needed. Then, open the Camera app and resume taking pictures.

- Clear the camera app’s cache.
As reported in the Lenovo forum, clearing the camera app’s cache might be necessary. The camera app accumulates cache in the background to expedite certain process, but excessive cache from frequent use could lead to app corruption. Follow these steps to clear cache:
Step 1: Long-press the Camera app icon to access the app info menu.
Step 2: Navigate to the Storage & cache menu.
Step 3: Select “Clear cache” to ensure smooth functionality of the Camera app on Android.

After refreshing the cache, reopen the Android phone’s camera to check if it’s functioning properly. If the camera still isn’t working, proceed to clear the app data by following these steps:
Step 1: Open the Settings app.
Step 2: Select “Apps.”
Step 3: Locate and tap on the camera app.
Step 4: Tap on “Storage.”
Step 5: Choose “Clear data.”
- Reset apps to default setting
To resolve a camera-not-working issue, consider resetting your apps to their default settings by resetting app preferences. This action revert settings for default apps, permission restrictions, disabled apps, and more. Use these steps to reset App Preferences on Android phone:
Step 1: Open the Settings app.
Step 2: Tap “Apps.”
Step 3: Access “More settings” at the upper right (three-dot icon).
Step 4: Select “Reset app preferences.”
Step 5: Restart your Android device and check for the problem.
- Run the Camera app in Safe Mode
This can help detect if other apps are causing interference. To initiate Safe Mode:
- Press and hold the Power button until the Power off window appears, then release.
- Touch and hold “Power off” until the Safe mode prompt appears, then release.
- Tap “Safe mode” to confirm.
The process may take up to 30 seconds to complete. Upon reboot, “Safe mode” appears in the lower-left of the home screen.
- Update your Android OS
Updating the Android OS can significantly improve your phone’s performance, including the camera app. Manufacturers frequently release security patches and software updates that address bugs and enhance functionality. Here’s how to update your phone:
Step 1: Open Settings and navigate to “System.”
Step 2: Look for “Software Update” or a similar option.
Step 3: Select “Check for Updates” and follow the on-screen instructions to download and install any available updates.

Ensure your device is connected to a stable Wi-Fi network and has sufficient battery charge before initiating the update process.
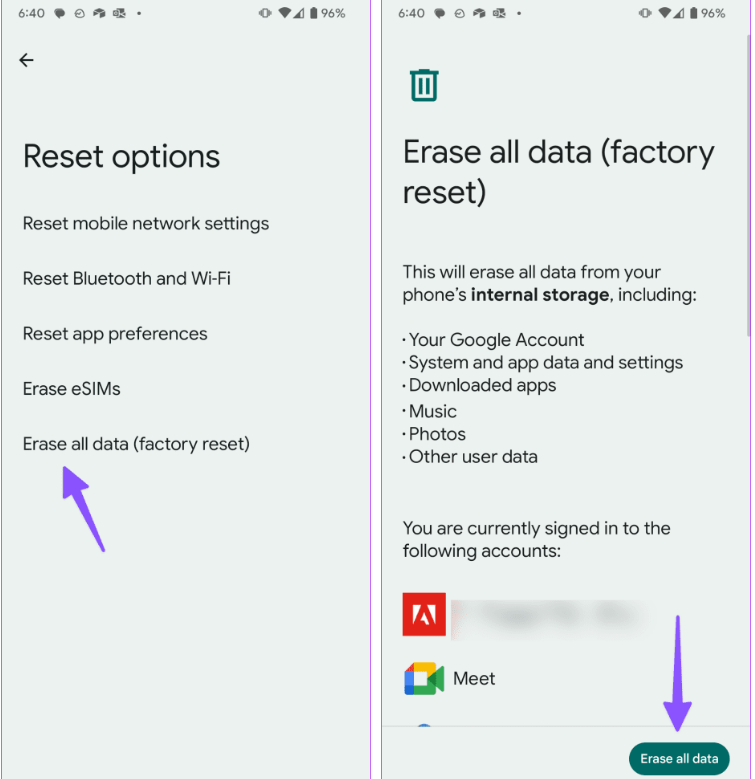
- Carry out a factory reset
Performing a factory reset is a last resort to address persistent camera issues. This step resets the device to its original settings and should only be attempted if none of the previous solutions have been effective. A factory reset erases all data and software settings on the phone. It’s a drastic measure but often resolves software-related issues causing camera errors. If the problem persists due to a software glitch, a factory reset will revert all settings to their default state.
To perform a factory reset on an Android device, follow these steps:
Step 1; Open the Settings app.
Step 2; Scroll down and tap on “General management.”
Step 3; Tap on “Reset.”

Step 4: Select “Factory data reset” from the options provided.
Step 5; Read the information displayed and then tap “Reset” to proceed.
Step 6; Tap “Delete All” to confirm and initiate the reset process.
In the event that the camera issues persist despite troubleshooting, consider exploring alternative options. Experiment with third-party camera apps available on the Google Play Store to capture still images. Sometimes, using a different camera app can circumvent persistent issues encountered with the default camera app on your device.


![Why is My TikTok Camera Not Working? [10 Ways to Fix It]](https://www.hollyland.com/wp-content/uploads/2024/08/why-is-my-tiktok-camera-not-working-10-ways-to-fix-it.jpg)